Sunday, May 29, 2011
Paintguide: Catachan Gunny Harker
This summary is not available. Please
click here to view the post.
Tuesday, May 24, 2011
Expanding the motorpool: Chimera
Another tank joins the motor poll –The command chimera ‘Pirana’ for the Catachan XI is now complete – This means that I have completed all my IG tanks, with the exception of one super heavy and a Valkyrie. :o)
You can see the paint process in the posts called “Expanding the motorpool: Hellhound & Chimera”.


Sunday, May 22, 2011
Evil skimmers
WIP: Follow up on the colour scheme for my Dark Eldar is to determine how to paint vehicle and other fastmovers. I gave it a try using the airbrush with a red brown as base and Ferrari red.

And followed it up with some brushwork on one of the jet bikes – Now all that remains is to make a decision on how and what to freehand on the hood of the bikes and wings of the hellions.

Any suggestions?
/Nicolai aka Atoom
Saturday, May 21, 2011
Dark Eldar Colour scheme
Testing is over – I have decided on a colour scheme, and I’m now ready for DE mass production. I went for a strong light blue hair to compliment the red armour. The hair sculpt on many of the new DE led my thoughts on to manga style comics and the blue hair is actual an extension of that thought.

I used Master Darksol’s DE paint guide in a modified version – You can find his guide here:
The colorus I used were:
Bases: | |
Rocks: Base - Charadon Granite DB – Fortress Grey HL – Space Wolf Grey | Sand: Base – Scorched Brown DB – Bestial Brown DB2 – Bleached Brown |
Armour: | |
Leather armour: Base - Charadon Granite DB – Fortress Grey Wash – Badab Black | Plate Armour: Base – Maghony Brown (AB) HL1 – Maghony Brown : Scarab Red 50:50 HL2 – Scarab Red HL3 – Blood Red HL4 – Yellow |
Other details: | |
Skin: Base – Dhenep Stone (Foundation) DB – Skull White Wash – Orgyn Flesh (light wash) | Hair: Base – Necron Abyss DB – Enchanted blue HL – Ice Blue Wash – Thraka Green |
Weapons – Gold: Base – Tin Bits DB – Shining Gold HL – Boltgun Wash – Devlan Mud | Weapons – Gold: Base – Boltgun HL – Mithril Silver Wash – devlan Mud |
I’m really looking forward to this project – So expect to see more DE on my blog soon :o) – Happy painting!
/Nicolai aka Atoom
Friday, May 20, 2011
Expanding the motorpool: Hellhound
Another tank joins the motor poll – the Hellhound ‘Fire Starter’. You can see the paint process in the posts called “Expanding the motorpool: Hellhound & Chimera”.
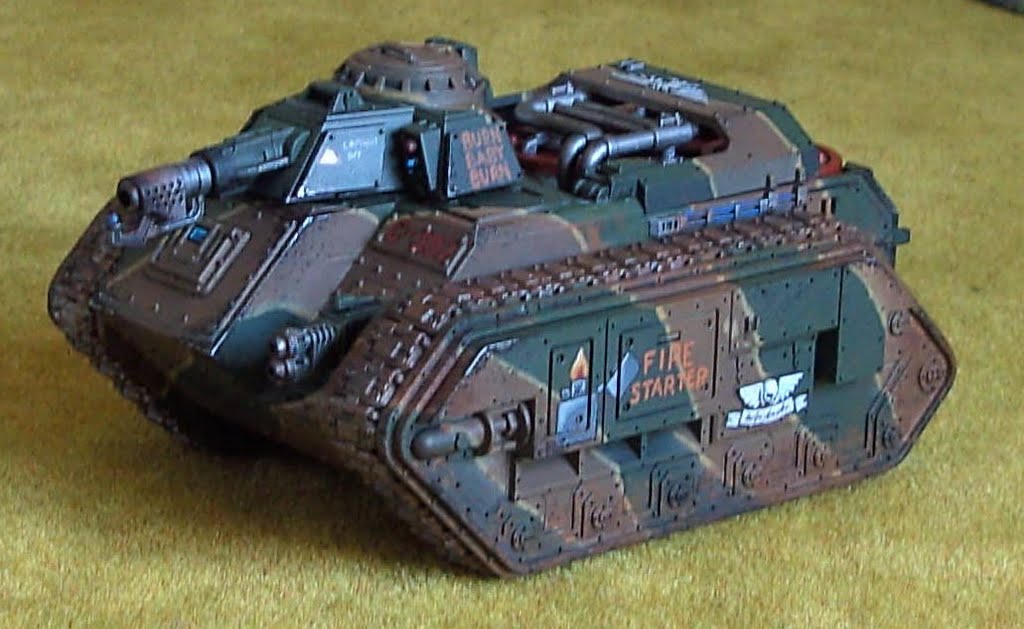


/Nicolai aka Atoom
Thursday, May 19, 2011
Gunny Harker
WIP: Gunnery Sergeant Harker has been on the wish list for some time now, but has for some reason been unavailable in both the local store and my Internet doll pusher. I have one now, Gunny Harker in a home made version that is.
I was working on some Melta veterans for my IG force, when I came across a head in the bit box that had SGT Harker written all over it, and from there I was tour the bits boxes to find the other pieces. I wanted to get a more action-oriented pose than the official Harker model, looking for something like this.

The bits used are:
Head: WoC Marauder Horseman
Torso, left arm & legs: Catachan Troopers
Right arm: WoC Marauder
Heavy bolter: Valkyrie doormounted HB.
Ammo feeds: Ork w40k
Ammo Box: IG vehicle
Grenades: IG Cadian Troopers
Here is the result – Note that some cleanup will be done before the model is to be primed / painted.


And the official Harker for comparison:

UPDATE:
My painted Harker can be seen here:
http://brushesanddolls.blogspot.com/2011/05/paintguide-catachan-gunny-harker.html
/Nicolai aka Atoom
Wednesday, May 18, 2011
Basing with cork – Escaping the sandbox
Some years back someone showed me who to make cool bases with cork – A neat little trick to avoid bases that look like a sand-box. The raw material for this is cork, taken from cork tablemats, those that were hot in the 1990s or so??
There are a lot of pros to using these opposed to bark, stones, wood-chip, plaster etc:
Cork Cork Cork
Working with the cork from the tablemats is pretty easy. I simply tear it apart and find some suitable pieces that fits the base. Some times I glue multiple layers of cork on top of each other to get height on the base.
I glue the cork to the base using PVA glue, and allow time for it to dry before basing the rest with flock or sand.

Then I apply PVA to the rest of the base and use a tub with sand or flock.

After the PVA holding sand or flock has dried I apply a layer of 50:50 PVA:Water to seal everything and prevent the sand from coming off when the mini is painted and transported to battle.

Following that I tend to litter the bases with bits from the bitsbox, to add some additional effects to the base.

And finally an example from some Space Marines that I did using this method. On a side note this method is excellent for lava-bases – All you have to do is to leave cracks between the pieces of cork and then paint them like lava.

/Nicolai aka Atoom
Tuesday, May 17, 2011
IG Diorama: Brothers in Arms
WIP: I’ve started working on a diorama that I’ve wanted to do for a long time now – The Brothers in Arms. This diorama has two major sources of inspiration:
The photo of American soldiers raising the flag at Iwo Jima in WWII

The other is this limited edition Space Marine model:
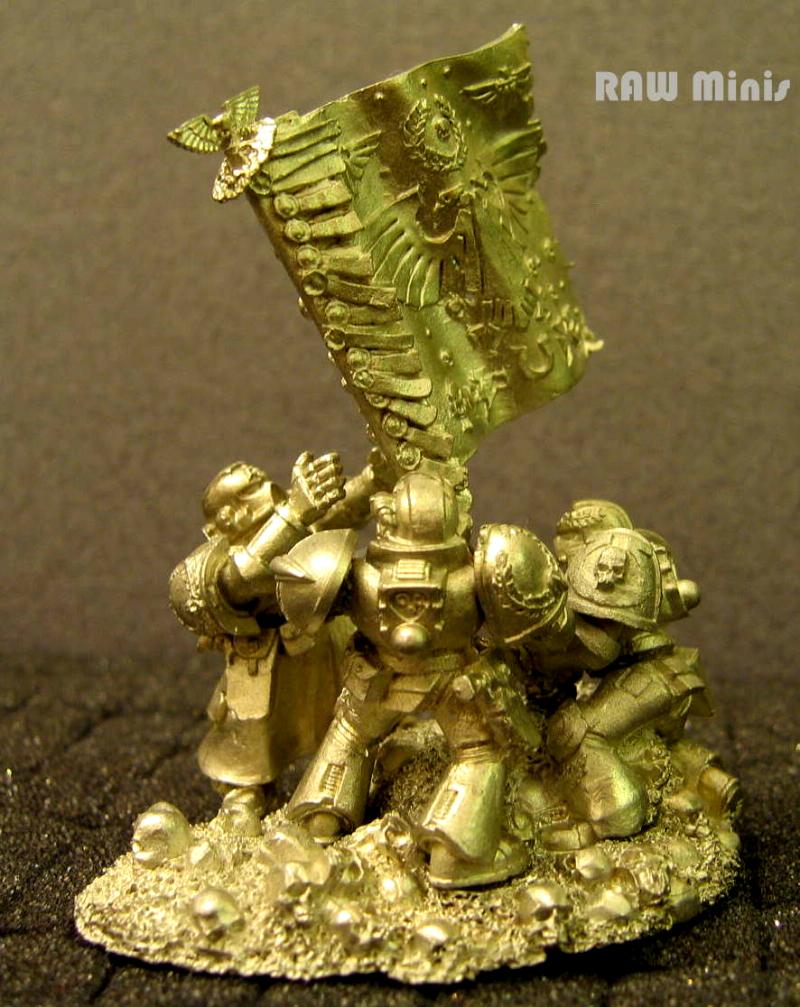
I wanted this in an Imperial Guard setting, so I brought out my bits box containing all the grunts and started gluing and cutting, and ended up with something that I’m actually quite happy about. There is still some work to be done before priming and painting can start, but I feel that the project is off to a good start, and is looking forward to painting the brothers in arms diorama.


UPDATE: Pictures of diorama painted can be found here: http://brushesanddolls.blogspot.com/2011/06/ig-diorama-brothers-in-arms.html
/Nicolai aka Atoom
Monday, May 16, 2011
Dark Eldar Colour Test v2.0
A while back I was looking for a colours scheme for my newly started Dark Eldar army. Originally this was a quest for a shortcut for painting the Elves using a combination of airbrush and inks – But it really was a failure. The test dolls wasn’t to my liking, and I spend quite a while thinking about how to avoid painting my Dark Eldar just like anyone else, and guess what I failed - AGAIN!
Then I came across this awesome guide on the blog "All Things 40k" that inspired me to give the codex paint style a try.
First here is the link to the guide used for painting my DE dolls v2.0:
It's really good, and definately something that I'm going to build my final Dark Eldar paint process on.
Second here is a picture of the result – Bear in mind that these are far from complete, and that the main purpose is to see the combination of leather and coloured armour.

I really like the blue version, but it just looks too WFB Highelf to me – It does not really give me that “oh-my-god-those-are-some-mean-dudes” feeling, so I think that I’m going to stick with the red version. I was really amazed how easy it was painting this, all it takes is a steady hand and a method to ensure that you don’t miss some armour plates in the paint process...
Finally you deserve a laugh – Here is version 1.0 of the colour test. Behold UGLY! :o)

/Nicolai aka Atoom
Subscribe to:
Posts (Atom)