Showing posts with label Tanks. Show all posts

Tuesday, May 24, 2011

Expanding the motorpool: Chimera

Another tank joins the motor poll –The command chimera ‘Pirana’ for the Catachan XI is now complete – This means that I have completed all my IG tanks, with the exception of one super heavy and a Valkyrie. :o)
You can see the paint process in the posts called “Expanding the motorpool: Hellhound & Chimera”.


/Nicolai aka Atoom

Friday, May 20, 2011

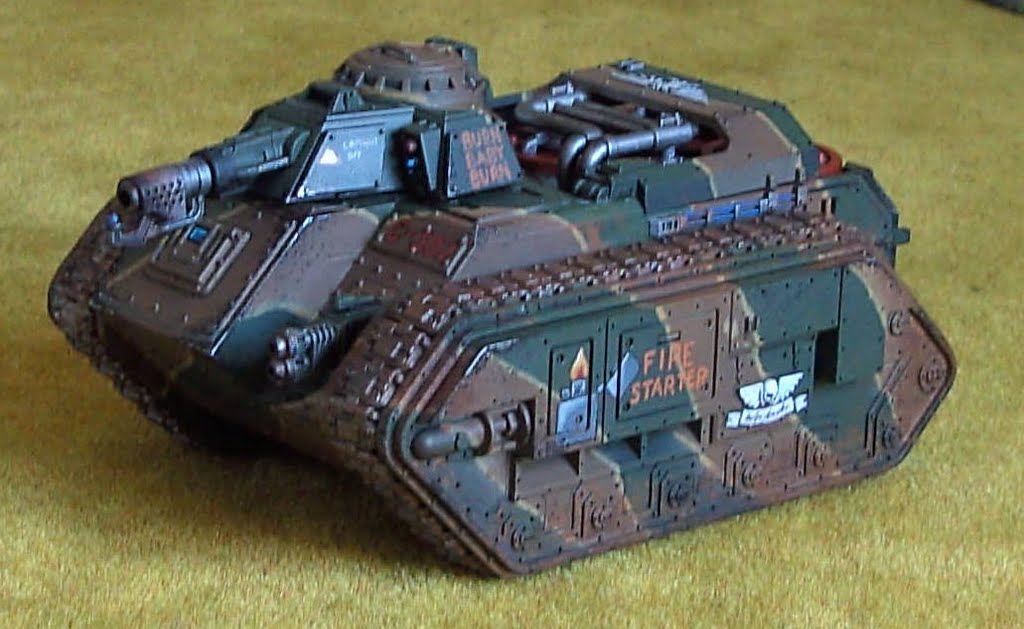
Expanding the motorpool: Hellhound

Another tank joins the motor poll – the Hellhound ‘Fire Starter’. You can see the paint process in the posts called “Expanding the motorpool: Hellhound & Chimera”.


/Nicolai aka Atoom

Wednesday, April 20, 2011

The motor pool

While rearranging one of my cabinets I thought that I would take some pictures of the motor pool. Here it is: 1 Baneblade, 2 self-propelled artillery pieces, 4 Leman Russes and 3 APVs. That leaves me with one APV, a Hellhound and another super heavy before it is complete…


/Nicolai aka Atoom

Sunday, April 17, 2011

Leman Russ Vanquisher

I finalised painting the Vanquisher today, so commander Pask finally got himself a tank. The tank is one I got years back, and it has been a low priority ever since. It is still a low priority, as I don’t expect to play any games using it. None the less it was nice to finally get it done.

The mud on this one is quite different from what I use to do on my tanks. It had been smeared with sand by its previous owner, making the muddy areas textured.


/Nicolai aka Atoom

Saturday, April 16, 2011

Expanding the motorpool: Hellhound & Chimera

Modelling a Hellhound straight out of the box, and building a Chimera for company command or some veterans is what I have been doing the last couple of days. Lets look at the Chimera first…

I wanted a ride for company command or some veterans (depending on the list played), and I wanted it to look very different from my other 3 Chimeras that are assembled w/o any conversions or bling. The idea was to make a vehicle that was heavily loaded for a longer campaign in isolated areas, and with my army theme being Catachans I had to include a Rambo driver. The basis of this was the vehicle accessories sprue, backpacks from the hwy weapons sprue and bits from the battlefield accessories sprue.


The other tank assembled was a Hellhound – There is not much to see, but my reason for showing is to remind people to consider painting and gaming, before gluing everything in place. As you see I haven’t glued in the fuel, top cover and back hatch. Reason for that is that I need to get access to the barrels for priming and painting. Another thing not glued is the turret mounted weapon. The new Hellhound allows various variants, and if not glued, they’re interchangeable, allowing you to field e.g. a Devil Dog in stead of a Hellhound just by switching the turret weapon – No magnets, no magic :o)


/Nicolai aka Atoom

Sunday, March 20, 2011

Knight Commander Pask

The ace of the Russ – Crack shot and high BS. Sounds good, but in my mind it doesn’t really make the cut, at least not in the standard Russ. In my usual games, we play 1500-1750points, and that leaves little room for 50 point upgrades on the Leman Russes that finds their way into that list…

Reason for me bringing Mr. Pask up is that I’m currently painting a vanquisher, which in my mind is the only good option for a tank ace as Pask’s special rules are related to tank hunting and the Vanquisher is the only tank hunting Russ in the IG codex.

I’m currently thinking in the lines of an IG ‘hero’ list, where I chuck as many named characters into the list as the points will allow – A list like that is likely the only time I’ll ever get to use him in a real game. I bought a 2nd hand vanquisher with a nice tank ace in the turret, but newer got around to painting it – Until now that is.

The vanquisher will follow soon.


/Nicolai aka Atoom

Friday, March 11, 2011

Leman Russ – The Punisher

I bought the new demolisher/punisher/executioner kit when it was released, and I must say that I’m very pleased with the kit. Not only does it have 3 different main weapons, but it has all the weapon variants for hull and sponson mounting are they’re interchangeable. At first is started looking at magnetizing the main gun, but it turned our that it wasn’t necessary as it can sit there on its own if you glue the gun mount in a slight upwards angle.

Now I’m done with the painting, and the Punisher is ready for action. I’ve played it a couple of times with my Catachans, and I just love the sad look on the opponent’s face as the punisher gatling cannon forces a wagon-load of saves.

Here it is in all it’s glory – Weathering and stencils used for marking have been described earlier on my blog, if you’re interested in how it was painted.


/Nicolai aka Atoom

Wednesday, March 9, 2011

Weathering tanks – Quick and dirty!

As mentioned in an earlier post tanks needs to get some weathering in order to look like they have seen action… I’ll show how I do mud and chipping of paint, quickly and with a nice finish.

The tools needed are:
  • A large drybrush, or any brush with stiff brushes for stibbling mud onto tracks and surrounding areas.
  • Some foam from a blister for making the chipped paint, tear off a piece, don’t cut it, as you need the rugged edge for application of paint.
  • Brown paints for the mud, at least two a dark and a light brown
  • Black and metal paints for the chipped paint effects.
Mud:
  1. Bring out your drybrush (you could use a stibbling brush, but I prefer a brush with long hair).
  2. Dip it in the darkest brown.
  3. Wipe some paint off on some paper.
  4. Stipple areas around the tracks and the tracks.
Repeat for each time you change to a lighter tone of brown. Stipple less and less for each time to leave the darker brown to show.


Chipped paint:
  1. Take the foam and dip the ragged edge in the black paint.
  2. Wipe some paint off on some paper (I tend to do that on my wet-palette, as it thins the paint).
  3. Press the foam gently against areas where a tank is likely to hit something that will remove paint, or areas where battle damage has occurred.
  4. Bring out a small brush.
  5. Paint the centre areas of the blacks with metal.


Combining the two I got his result in 20 minutes or so:


/Nicolai aka Atoom

Tuesday, March 8, 2011

Black-lining – Quick and easy!

Just a quick tutorial on how to cut corners on black-lining – Something I personally hate, until now that is. I’m pretty sure that this is no news to many, but I’ll post it anyways, as I estimate that I save more than an hour using this technique for every tank I paint.

The tool is simply a pen! A black pen 0.1mm water based, water resistant, pigment ink pen! The pen is used to simply draw the black lines onto the tank instead of using a brush. It is easy to handle, making it fast and reducing the mistakes to a minimum.

Here are some pictures:

Before:
After:

Now all it needs is some weathering and freehand – Something that I’ll get back to another time…


Not only is the pen good for black-lining tanks, it also works on power-armour and other minis where the recesses are clearly defined. Another use for the pen is shading freehand and drawing text, as it is much more steady than a brush (at least in my hands that is).

/Nicolai aka Atoom

Friday, March 4, 2011

Basilisk – The Cross Eyed Monkey!

I’ve had this tank for years, but never really played it, nor got around to painting it. I bought the Basilisk with a small collection of IG, and it had really had a hard life. The firing platform and railing was snapped off, and the tracks on one side were missing. I restored that and finally completed the painting yesterday.

All my tanks have a nickname, and this one is no different. The reason for naming it the cross eyed monkey is the fact that the artillery dice can make or break a game – Just like a cross eyed gunner on a self-propelled artillery piece :o)

Enjoy!


/Nicolai aka Atoom

Tuesday, March 1, 2011

Playing with the airbrush – Light and shade II…

Following the experiment with light and shade on the storm troopers (see post light and shade I) I decided that I would like to give it a go on some tanks, to see if it was possible to get the edge highlights for free. The storm troopers were lighted using white, but it actually took the green colour to a too light tone.

That is why I decided to use yellow for lighting the tanks. I sprayed all edges and raised areas that I wanted to have a highlight, then I sprayed the tanks with the camo-green that they were intended to have. I’m really pleased with the result, as the yellow brings the camo-green ‘alive’.

Judge for yourselves:


/Nicolai aka Atoom